Introduction
In MVC (Model View Controllers) 3 I used a Razor view to create a simple registration form. To do this, first the registration request page is opened; if the user clicks on the registration link then the registration form is opened and after entering all the details the congratulation message will displayed that shows the registration is successfully completed. In this I used models, views and controllers. To create this simple form use the following steps:
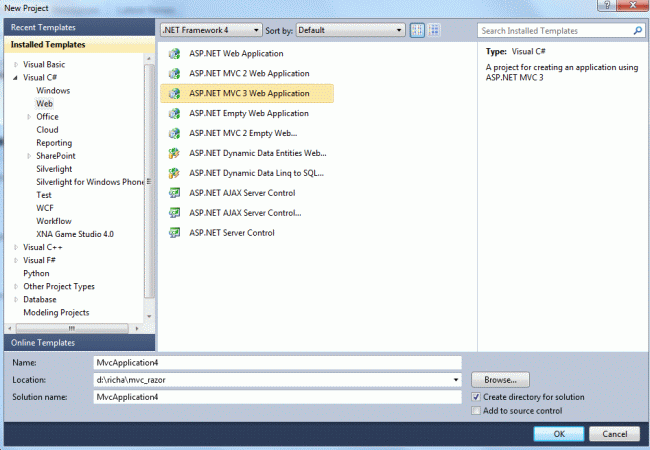
Step 1 : Open the Visual Studio 2010 and select new project from the file menu. A dialog box appears; in that, under C# -> web, select "ASP.NET MVC3 Application" and click the Ok button:
Step 2 : A window is opened; in that select Empty from the template option and select Razor from the View engine option and click ok.

Step 3 : Now add the Controller by right-clicking on the controller folder placed at the Solution Explorer by clicking add->Controller.

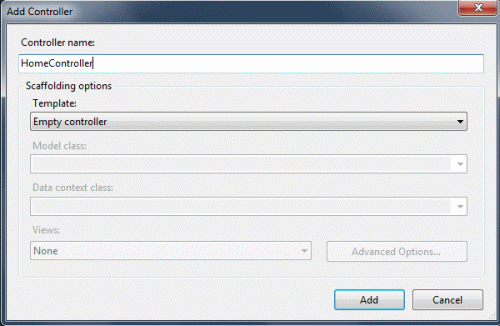
Step 4 : A window will opened; give the name of the controller as HomeController and add it:
Step 5 : Modify the HomeController.cs file as:
Step 6 : Now right-click on the ViewResult method in order to add the view, like:

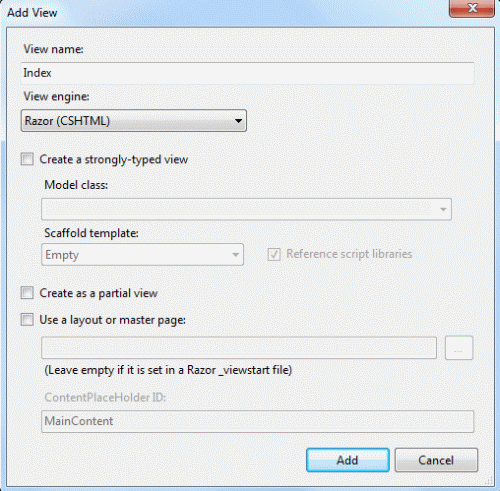
Step 7 : A window will appear; in it give the name of the view and click add. The extension of the view is cshtml.
Step 8 : Write the code in index.cshtml as:
Step 12 : Now in order to add the registration link modify the index.cshtml file as:

In MVC (Model View Controllers) 3 I used a Razor view to create a simple registration form. To do this, first the registration request page is opened; if the user clicks on the registration link then the registration form is opened and after entering all the details the congratulation message will displayed that shows the registration is successfully completed. In this I used models, views and controllers. To create this simple form use the following steps:
Step 1 : Open the Visual Studio 2010 and select new project from the file menu. A dialog box appears; in that, under C# -> web, select "ASP.NET MVC3 Application" and click the Ok button:

Step 2 : A window is opened; in that select Empty from the template option and select Razor from the View engine option and click ok.

Step 3 : Now add the Controller by right-clicking on the controller folder placed at the Solution Explorer by clicking add->Controller.

Step 4 : A window will opened; give the name of the controller as HomeController and add it:

Step 5 : Modify the HomeController.cs file as:
using System.Web.Mvc;
namespace MvcApplication4.Controllers
{
public class HomeController : Controller
{
public ViewResult Index()
{
return View();
}
}
}
Step 6 : Now right-click on the ViewResult method in order to add the view, like:

Step 7 : A window will appear; in it give the name of the view and click add. The extension of the view is cshtml.

Step 8 : Write the code in index.cshtml as:
@{
Layout = null;
}
<!DOCTYPE html>
<html>
<head>
<title>Index</title>
</head>
<body>
<div>
<h3>Please fill the registration form by clicking on the following registration link</h3>
</div>
</body>
</html>
Step 9 : Add the Model by right-clicking on the Model folder in the Solution Explorer and add the class:

Step 10 : A window will appear; in it select a class and give the name of the class as Registration.cs and click ok:

Step 11 : Write the code in Registration.cs as:
Step 9 : Add the Model by right-clicking on the Model folder in the Solution Explorer and add the class:

Step 10 : A window will appear; in it select a class and give the name of the class as Registration.cs and click ok:

Step 11 : Write the code in Registration.cs as:
namespace MvcApplication4.Models
{
public class Registration
{
public string Name { get; set; }
public string Email { get; set; }
public string Phone { get; set; }
public string Address { get; set; }
}
}
Step 12 : Now in order to add the registration link modify the index.cshtml file as:
@{
Layout = null;
}
<!DOCTYPE html>
<html>
<head>
<title>Index</title>
</head>
<body>
<div>
<h3>Please fill the registration form by clicking on the following registration link</h3>
@Html.ActionLink("Registration", "RegistrationForm")
</div>
</body>
</html>
Step 13 : When I run this the output will look like:

Step 13 : When I run this the output will look like:

Step 14 : Now In order to perform the action when I click on the Registration link write and modify the code as, modify the Controller as:
namespace MvcApplication4.Controllers
{
public class HomeController : Controller
{
public ViewResult Index()
{
return View();
}
public ViewResult RegistrationForm()
{
return View();
}
}
}
Step 15 : Now add the View for the Registration Form by right-clicking on the ViewResult. In this step I am going to create the strongly typed view.
Step 15 : Now add the View for the Registration Form by right-clicking on the ViewResult. In this step I am going to create the strongly typed view.

Step 16 : Write the code in the RegistrationForm.cshtml file as:
@model MvcApplication4.Models.Registration
@{
Layout = null;
}
<!DOCTYPE html>
<html>
<head>
<title>RsvpForm</title>
</head>
<body>
@using (Html.BeginForm())
{
<p>
Your name: @Html.TextBoxFor(x => x.Name)
</p>
<p>
Your email: @Html.TextBoxFor(x => x.Email)</p>
<p>
Your phone: @Html.TextBoxFor(x => x.Phone)</p>
<p>
Your address: @Html.TextBoxFor(x=>x.Address)</p>
<input type="submit" value="Register Me" />
}
</body>
</html>
Step 17 : Again modify the Controller in order to generate the event when the registration button is clicked:
Step 17 : Again modify the Controller in order to generate the event when the registration button is clicked:
using MvcApplication4.Models;
namespace MvcApplication4.Controllers
{
public class HomeController : Controller
{
public ViewResult Index()
{
return View();
}
[HttpGet]
public ViewResult RegistrationForm()
{
return View();
}
[HttpPost]
public ViewResult RegistrationForm(Registration registration)
{
return View("Congratualation", registration);
}
}
}
Step 18 : Again create the view for the third ViewResult as we create for the second the strongly typed view and give the name of the view as Congratualation.
Write the code in Congratualation.cshtml file as:
Write the code in Congratualation.cshtml file as:
@model MvcApplication4.Models.Registration
@{
Layout = null;
}
<!DOCTYPE html>
<html>
<head>
<title>Congratualation</title>
</head>
<body>
<div>
<h1>Congratualation, @Model.Name!!!</h1>
<p>Your Registration has been Successfully completed.</p>
</div>
</body>
</html>
Step 19 : Now build the application and then run it; you will see the result as:

When I click on the Registration link then:
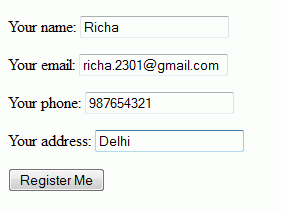
When the Register Me button is clicked then:
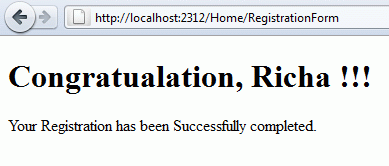

When I click on the Registration link then:

When the Register Me button is clicked then:

Questions came while doing this simple application those are
What is the difference between Html.Textbox and Html.TextboxFor?
Ultimately they both produce the same HTML but Html.TextBoxFor() is strongly typed where as Html.TextBox isn't.
1: @Html.TextBox("Name")
2: Html.TextBoxFor(m => m.Name)will both produce
<input id="Name" name="Name" type="textbox" />

No comments:
Post a Comment